Drilling a hole in a glass bottle might seem like a daunting task at first, but with the right tools and techniques, it can be accomplished quite easily. Whether you want to create a unique lamp, craft a homemade water pipe, or repurpose a bottle for a DIY project, this guide will walk you through the steps to drill a hole in a glass bottle safely and efficiently.
Why Drill a Hole in a Glass Bottle?
Before diving into the how-to, let’s explore why you might want to drill a hole in a glass bottle. Glass bottles can be transformed into various creative projects, such as:
Decorative Lamps: You can turn old glass bottles into beautiful lamps by drilling a hole for the electrical cord.
Water Pipes: Many DIY enthusiasts enjoy crafting their own water pipes or bongs from glass bottles.
Terrariums or Planters: Drilling a hole allows for drainage, making glass bottles suitable for planting small succulents or other plants.
Artistic Projects: Artists often use glass bottles as canvases or bases for creative projects.
Gather Your Materials
Before starting, you’ll need to gather a few essential tools and materials. Having everything ready will streamline the process and ensure safety.
Essential Tools
Glass Drill Bits: These drill bits are specifically designed for cutting through glass. They are often coated with diamond or carbide to enhance durability. The size of the bit depends on the size of the hole you want to drill, so choose accordingly.
Electric Drill: A standard electric drill will work, as long as it can accommodate your chosen drill bit. Ensure that your drill is in good working condition to avoid any issues during the drilling process.
Safety Equipment: Safety glasses and gloves are a must when working with glass. They protect your eyes and hands from any potential shards or debris that may occur during drilling.
Masking Tape: This is essential for marking the drilling spot. It helps prevent the drill bit from slipping on the smooth surface of the glass.
Coolant (Optional): Using water or cutting oil as a coolant can help keep the drill bit cool and reduce the chances of the glass cracking during the drilling process.
Preparing the Bottle
Preparation is key to a successful drilling experience. Follow these steps to prepare your glass bottle:
- Clean the Bottle: Start by thoroughly cleaning the bottle, both inside and out. Any residue or dirt can interfere with the drilling process.
- Dry Completely: Make sure the bottle is completely dry before you proceed. Moisture can create challenges when drilling.
- Apply Masking Tape: Place a piece of masking tape over the area where you plan to drill the hole. This will give the drill bit something to grip onto and help prevent slipping, ensuring more accurate drilling.
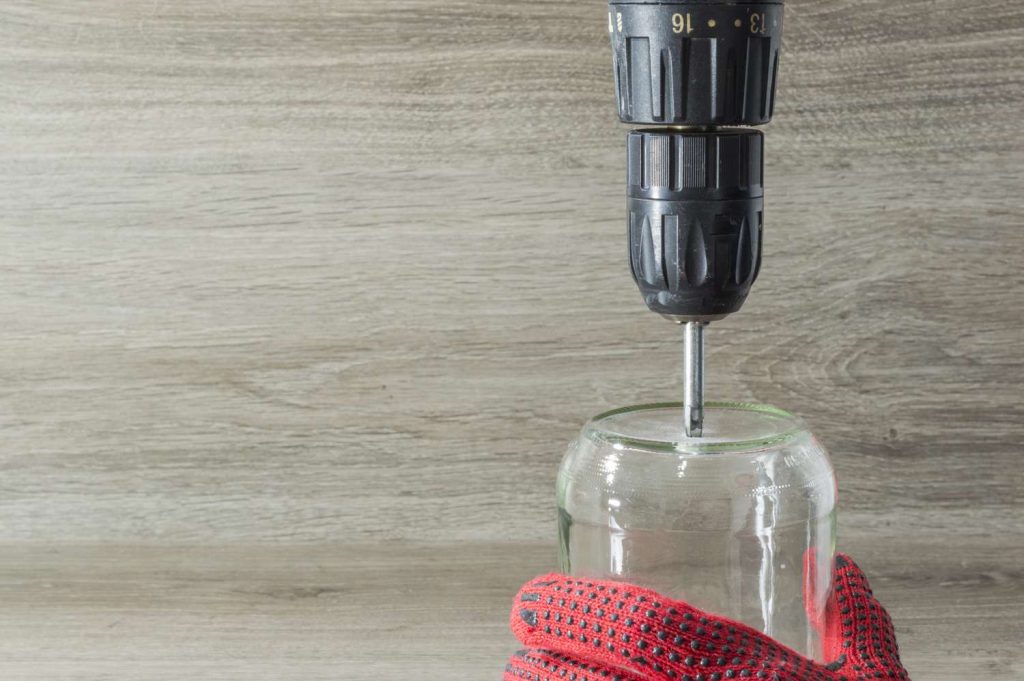
Drilling the Hole
Now that your bottle is prepared, it’s time to start drilling. Follow these steps carefully to ensure safety and effectiveness:
- Put on Safety Gear: Begin by putting on your safety glasses and gloves. This step is crucial to protect yourself from any potential glass shards.
- Position the Drill Bit: Start by positioning the drill bit at an angle against the glass where you’ve placed the masking tape.
- Start the Drill: Begin drilling at a slow speed. Allow the drill bit to create a small indentation in the glass. This initial guide hole will help keep the drill bit steady as you continue.
- Adjust the Angle: Once the guide hole is established, gradually adjust the drill to a perpendicular angle to the glass. Maintaining a perpendicular angle is important for a clean hole.
- Drill Steadily: Continue drilling at a slow and steady pace. It’s crucial to apply gentle pressure; pushing too hard could cause the glass to crack. Be patient and let the drill do the work.
- Use Coolant Sparingly: If you’re using a coolant, apply it sparingly throughout the drilling process. This will help keep the drill bit cool and extend its lifespan, reducing the risk of overheating.
Finishing Up
After you’ve successfully drilled the hole, there are a few final steps to ensure the glass bottle is safe to handle:
- Remove the Tape: Carefully remove the masking tape from the bottle.
- Clean the Bottle Again: Clean the bottle again to remove any glass dust or shards that may have accumulated during the drilling process.
- Smooth the Edges: Use fine-grit sandpaper to smooth the edges of the hole. Be cautious not to cut yourself on the sharp edges of the glass.
- Final Rinse: Rinse the bottle one last time to ensure all glass dust is removed. This step is important for safety, especially if you plan to use the bottle for food or drink.
Safety Precautions
When working with glass, safety should always be your top priority. Here are some additional safety tips to keep in mind:
Work in a Safe Area: Choose a well-lit, clean workspace where you can focus on the task without distractions.
Be Aware of Glass Shards: Keep your workspace free of clutter, and be mindful of any glass shards that may fall during the drilling process.
Dispose of Waste Properly: After finishing your project, be sure to dispose of any glass shards or debris safely. Use a dustpan and brush to collect small pieces, and store them in a sturdy container before discarding.
Conclusion
While drilling a hole in a glass bottle may seem intimidating at first, with the right tools, techniques, and patience, it’s a task you can successfully perform at home. Always remember to prioritize safety, take your time, and don’t rush the process. With practice, you’ll be able to create beautiful, functional pieces from your old glass bottles.
If you ever feel unsure or uncomfortable performing these tasks, it’s best to seek professional help. There are many local craftspeople and workshops that can assist with glass drilling and other DIY projects. Happy crafting, and enjoy your newfound skills!