In the development of mankind, glass has a long history. For us, glass is one of the most incredible and useful materials, it has been used in every field of humanity. At the same time, we also know that glass is a man-made material.
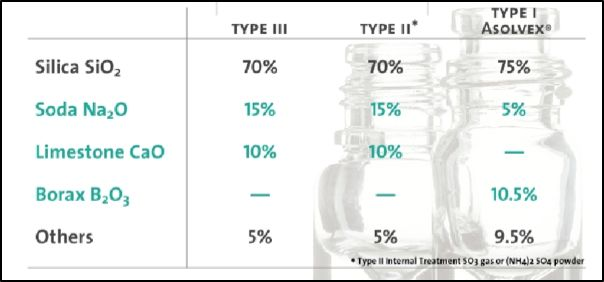
Hollow glass can be used in many different fields, and we divide it into three categories: Type I, Type II, and Type III.
Glass types are distinguished based on glass composition and internal surface treatment
Their differences are due to the different glass composition systems used. Type I glass is borosilicate glass, Type II and III are soda-lime silicate glass. As for Type II and Type III, Type II is mainly based on Type III, using SO3 or NH4SO4 powder to dealkalize the inner surface of the bottle. (Note: The purpose of dealkalization treatment is mainly to improve the water resistance of glass bottles so that they are suitable for containing neutral to weakly alkaline injections)
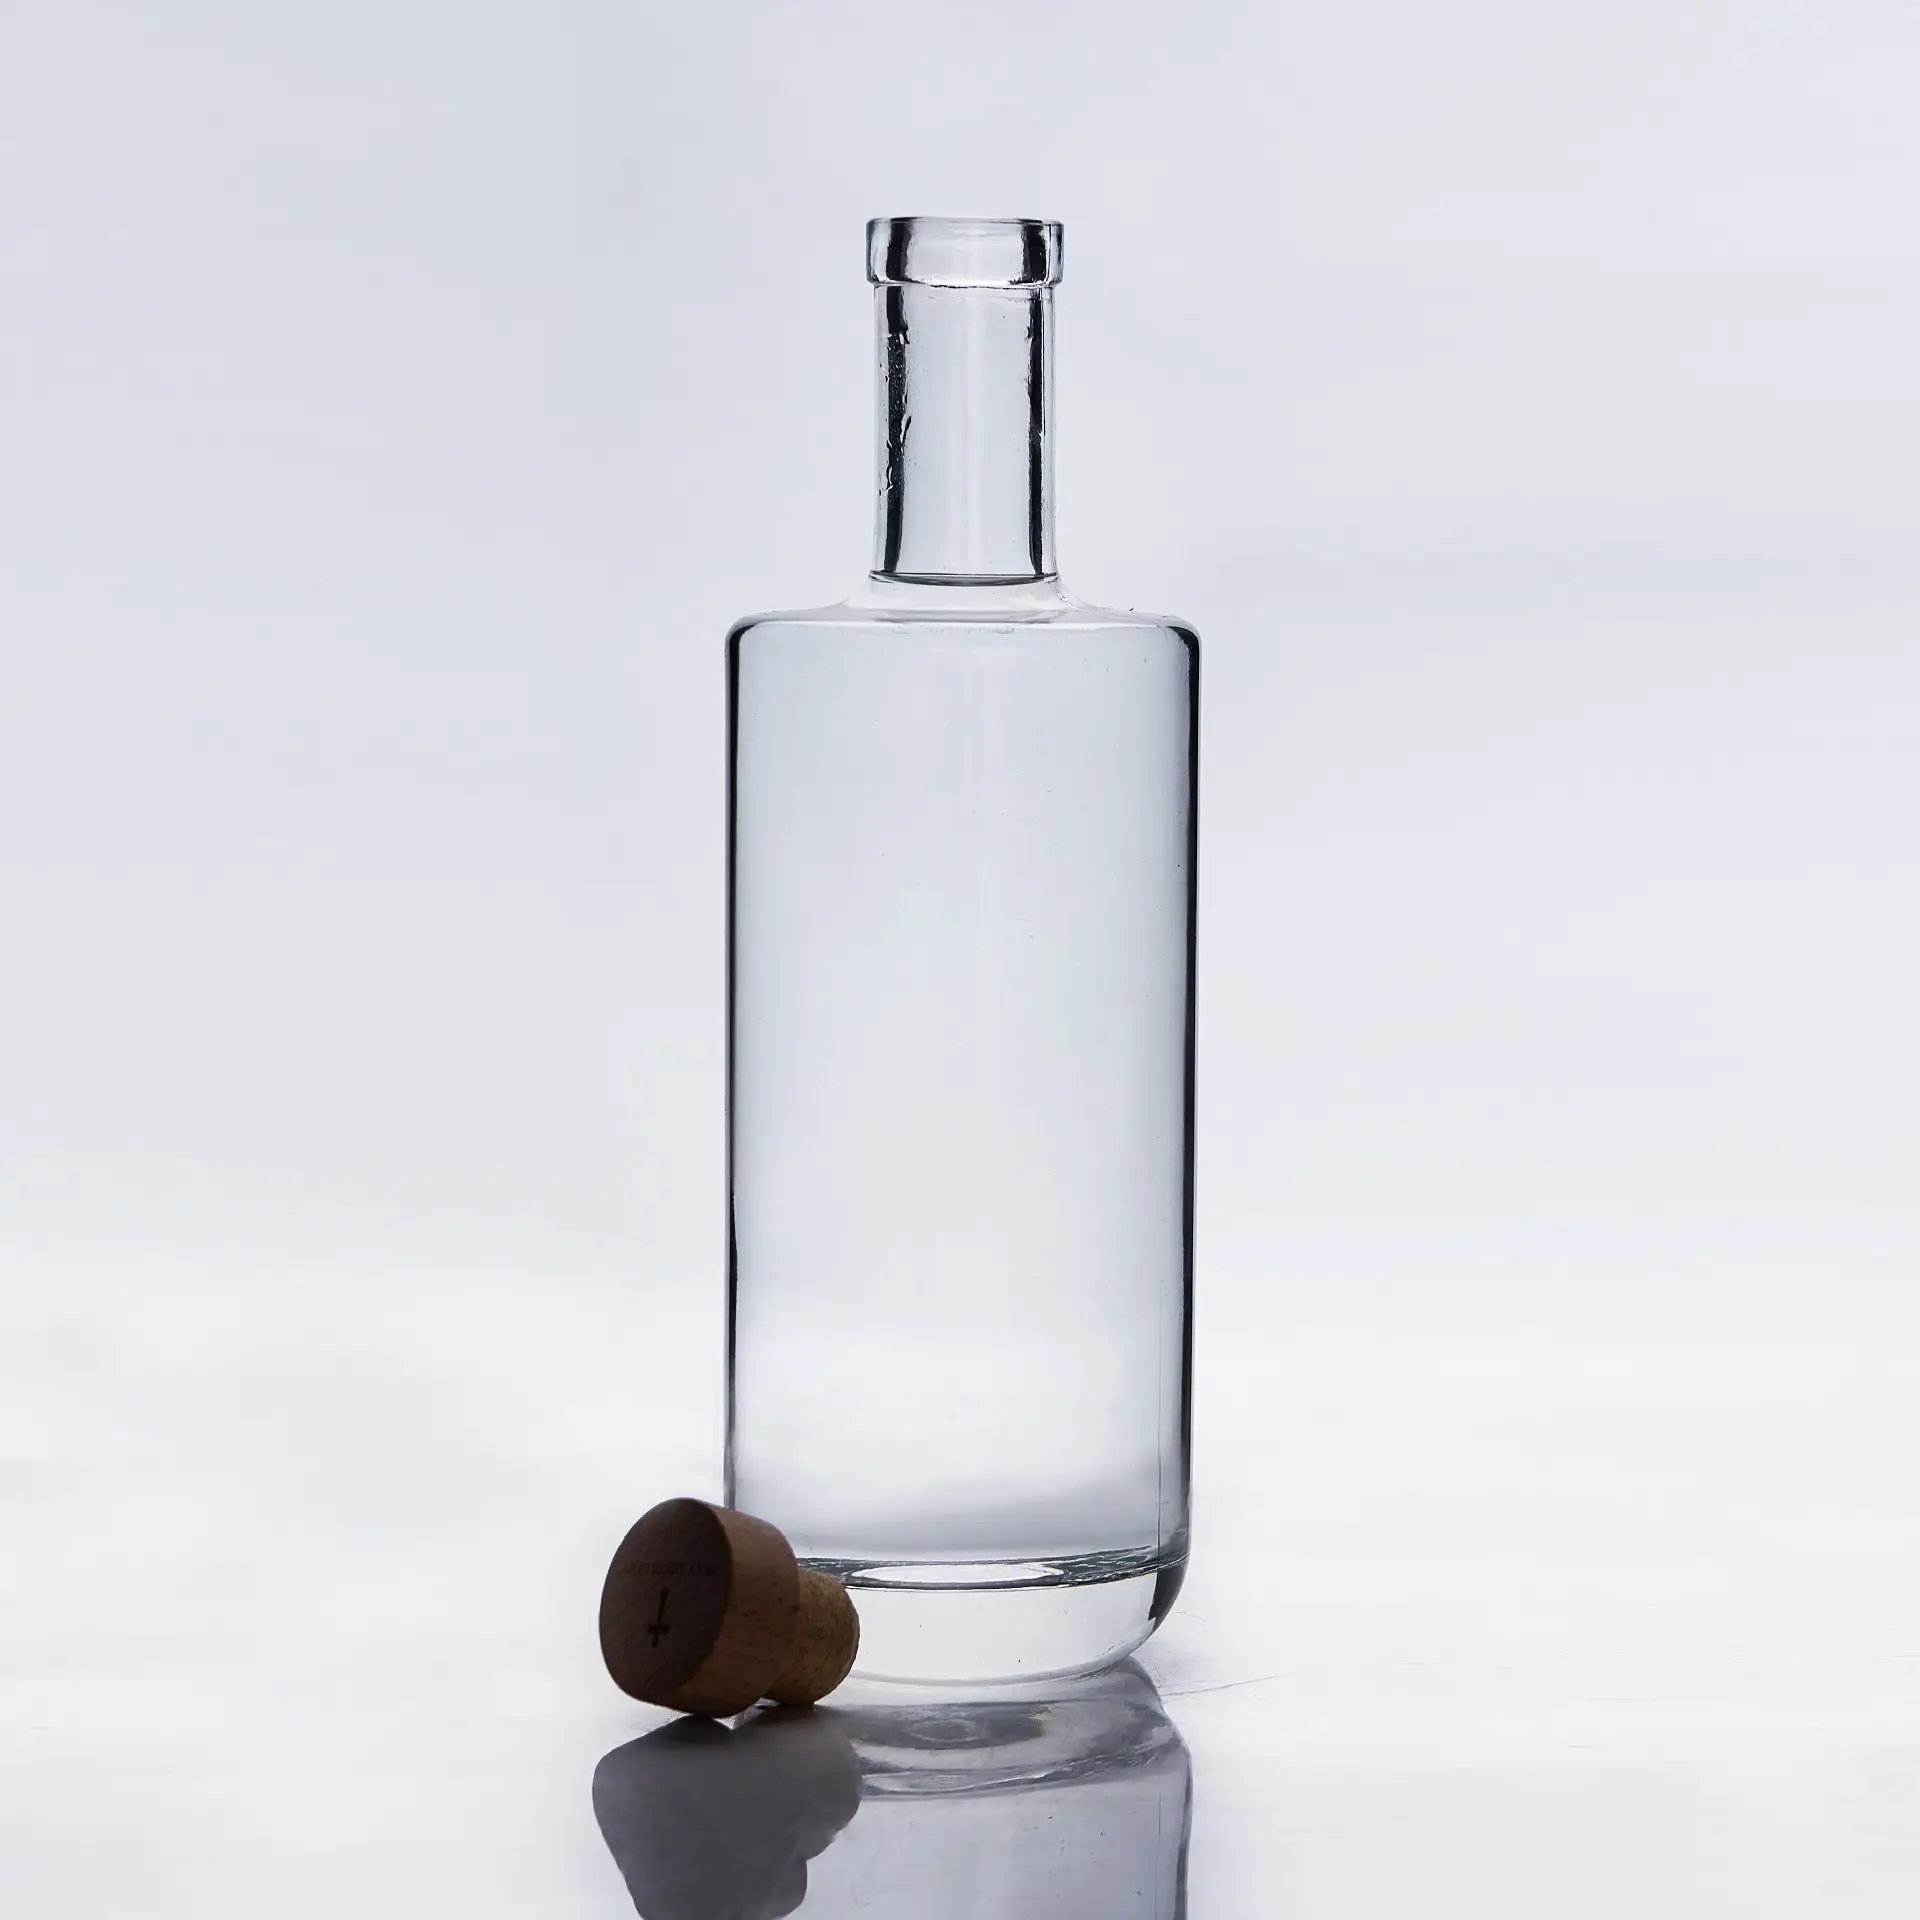
For cosmetic glass packaging, Type III glass is mainly used because the contents of cosmetics have less corrosion on the glass.
Soda lime glass raw material composition
The main raw materials of glass are sand, soda ash, calcite, and feldspar, which account for more than 98% of the raw materials of glass. Other small ingredients include clarifiers, colorants, decolorizing agents, etc. In addition, thanks to the powerful ability of glass, in order to recycle glass and reduce energy consumption, we also use cullet as one of our main raw materials (generally in the range of 0%-50%, sometimes even 100%,). This is why we say glass is an environmentally friendly material.
We can clearly see the function of each raw material from the table below
Main functions of raw materials and their role in glass melting
Soda-lime glass melting process
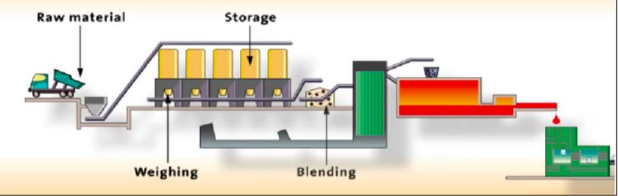
- Preparation of batch materials
The batching room places glass raw materials in different silos according to requirements before the mixture enters the kiln. The process steps are shown in the figure:
melting process
Step 1: Transport raw materials to the glass batching room by train or truck, and ensure compliance with size and composition through visual inspection and sample testing.
Step 2: Raw materials are placed at their respective unloading points, then transported to the batching room via elevators, and finally transported to their respective silos.
Step 3: Before entering the kiln, the raw materials pass through the electronic scales under their respective silos and are batched and proportioned.
Step 4: Typically, raw materials are weighed one at a time and batch to batch accurate.
Step 5: The scale’s sensitivity is monitored daily and calibrated every week to ensure accuracy.
Step 6: Once weighing is complete, the raw materials are conveyed to the mixer.
Step 7: In some factories, cullet is added after mixing in order to minimize the wear and tear of the cullet on the mixer.
Step 8: The mixed mixture will be transported to the kiln via horizontal belts or monorails.
Step 9: In order to reduce dust, layering and flying materials during the transmission process, appropriate moisture is often added before mixing.
Step 10: Wet material enhances batching control in the kiln, which is very beneficial for efficient melting.
- Melting process
The mixture is continuously added to the kiln through a feeder.
-~100°C: The mixture is dry (~humidity is about 4%)
-~700°C: solid phase reaction between carbonates
From 800°C: elimination of carbonates and reaction with silica (approximately 16% by weight)
Starting at 850°C: reduction of sulfate and iron oxide by carbon
Starting from 1200°C, clarification is accompanied by dissolution and expansion of silica
In the soda-lime-silica glass container industry, there are two main types of kilns, horseshoe-flame furnaces and cross-flame furnaces. The picture below shows the structure of the horseshoe flame regenerator kiln.
Horseshoe stove
This kind of kiln has two small furnaces, side by side on the back wall of the kiln, and the regenerator is located at the back of the kiln. Each small furnace is equipped with 2-4 heating guns. These heating guns can use different fuels, such as heavy oil and natural gas, depending on the size of the kiln. The flame comes out from the small furnace on one side, then turns 180° and exits from the other small furnace. The path taken by the flames and exhaust gases is like a horizontal “U”. This design allows the combustion gas to have a relatively long residence time in the kiln, thus saving energy.
This kiln is also equipped with a combustion air preheating system, which is what we often call a regenerator. Regenerators allow us to reuse the heat energy of the burned exhaust gases. One of the two regenerators absorbs the heat from the combustion exhaust gas (approximately 1300°C), thereby heating the grid refractory material in the regenerator. The combustion air enters the kiln through another regenerator. After a certain period of time, the flow of combustion air and combustion exhaust gases will reverse direction. The combustion air flows through the regenerator that has just been heated by the exhaust gas and enters the kiln. The heat stored in the grid will be transferred to the combustion air to heat the air. Through heat exchange like refractory materials, energy can be saved and reused.
- Feed channel used to transport molten glass to the forming machine
Typically, the temperature of the glass coming out of the kiln is too high for container glass forming. Therefore, the molten glass first flows into the refractory material flow channel, which is what we call the feed channel (see the picture below). The function of the feed channel is to cool the glass to the working temperature and at the same time make the temperature of the cooled glass uniform.
One of the design styles of the feed channel
In the feed channel, the glass with good thermal uniformity will be cut into gobs by the scissor system, and then enter the forming machine, and finally formed into bottle-shaped glass.
Molding
The forming process of glass bottles and jars refers to a series of action combinations (including mechanical, electronic control, etc.) that are repeated in a given programming sequence, with the goal of producing a bottle and jar with an expected specific shape.
There are currently two main processes for the production of glass bottles and jars: the blow-blow method for narrow bottle mouths and the pressure-blow method for larger diameter bottles and jars.
Blowing method
Pressure blow method
In these two molding processes, the molten glass liquid is cut by a shear blade at its material temperature (1,050-1,200°C) to form cylindrical glass droplets, called “gobs.” The weight is enough to produce a bottle. Both processes start from shearing the glass liquid. The droplets fall under the action of gravity, and pass through the trough and turning trough into the preliminary mold. Then the preliminary mold is closed tightly and is removed from the top by the trough. The “bulky head” is used for sealing.
Initial mold forming process
During the blow-blowing process, the glass is first pushed down by the compressed air passing through the bulkhead, so that the glass at the die is formed; then the core moves slightly downward, and the compressed air passing through the gap in the core position expands from bottom to top. The extruded glass fills the preliminary mold. With such glass blowing, the glass is formed into a hollow prefabricated shape, which is subsequently blown again by compressed air in a second stage to obtain the final shape.
Glass bottle forming process diagram
The production of glass bottles and jars takes place in two main stages: in the first stage all the details of the mouth mold are formed and the mouth is completed including the inner opening, but the main shape of the glass product will be much smaller than its final size. These semi-formed glass products are called parisons, and in the next moment they are blown into the final bottle and jar shape.
Schematic diagram of pressure blow molding process
From the perspective of mechanical action, the die and core form a closed space below. After the die is filled with glass (after gassing is completed), the core is slightly retracted, causing the glass in contact with the core to soften slightly. Then the compressed air from bottom to top (back blow air) passes through the gap under the core to form the parison. Then the bulkhead rises, the preliminary mold is opened, and the flip arm, together with the die and parison, is flipped to the mold side.
When the flip arm reaches the top of the mold, the molds on both sides will be closed and clamped to wrap the parison. The die will open slightly to release the parison; then the flip arm will return to the primary mold side and wait for the next round of action. The blowing head is lowered to the top of the forming mold, compressed air is poured into the parison from the middle, and the extruded glass expands toward the forming mold to form the final bottle and can shape.
In the press-blow process, the parison is no longer formed using compressed air, but is formed by extruding glass through a longer core in the closed space of the preliminary mold cavity. Subsequent flipping and final shaping are consistent with the blow-blowing method.
The subsequent bottles will be clamped out of the mold by bottle clamps and placed on the bottle stop plate with bottom-up cooling air, waiting to be transferred to the annealing process.
bottle making machine
Bottle making machine refers to equipment that can make glass bottles and jars.
Generally speaking, the bottle making machine includes the most basic 19 action operations to form a bottle. At present, most bottle making machines and mechanisms are driven by compressed air (high pressure 4.2 bar, low pressure 2.2 bar). The device is electronically controlled by a timer system to coordinate all movements.
Bottle making machine equipment
The most widely used bottle making machine is the individual group bottle making machine (IS machine). This machine has 2-20 identical groups, each of which contains a complete set of mechanisms to meet the needs of bottle and can production. All groups of gobs are fed into each group via a moving scoop called a gob distributor. The bottle making machine can make one, two, three or four bottles at the same time (referred to as single, double, triple and quadruple drops). Today, even a 6-drop bottle making machine has been successfully developed and put into production. In the case of multiple gobs, the scissors cut the gobs at the same time and fall into the preliminary mold at the same time.
annealing
As glass cools, it shrinks and solidifies. Uneven cooling and rapid cooling cause stress in the glass, which can cause the glass to become brittle or explode. The function of the annealing furnace is to heat glass bottles and jars to about 580°C, and then slowly cool them to relieve the stress generated during glass molding and ensure the safety of the glass containers. This annealing process depends on the glass thickness and generally takes 20 – 60 minutes.